Are you doing some DIY work and wondering how to use a rotary laser level? A rotary laser level can be a useful tool when you are performing tasks such as hanging shelves or aligning a kitchen countertop. It is important to know the basics of how to use this tool, so that you can get accurate results without having to redo your work. In this article, we will provide a guide on using a rotary laser level.
1. What is a Rotary Laser Level?
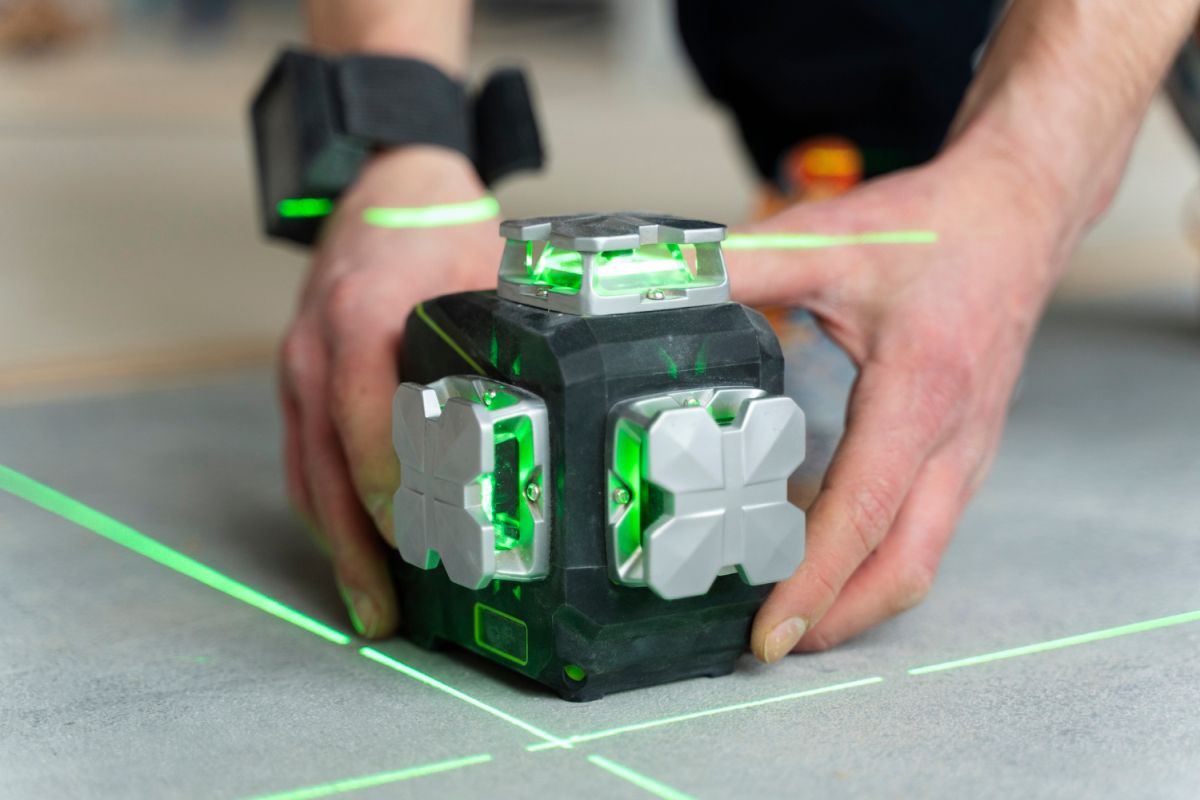
A Rotary Laser Level is a tool used in construction to help provide accurate measurements and level surfaces. It has an oscillating rotating head that emits a laser light that projects beams in various directions, giving engineers and builders an easy way to measure surfaces quickly and accurately. The light can project lines up to 360 degrees in both horizontal and vertical planes, making it able to measure large areas. This makes it ideal for larger projects as it can easily cover larger areas in less time.
Rotary Laser Levels are often classified as either self-leveling or manual-leveling. Self-leveling lasers automatically adjust themselves to level off an area or measure an angle, making it easy for DIY projects. Manual-leveling lasers however require an experienced operator to manually adjust the device to ensure accuracy.
Using a Rotary Laser Level is not difficult – you’ll need to:
- Mount it securely – on a tripod or similar support to ensure it remains level and secure.
- Set it to the desired measurement – you can switch between horizontal and vertical, depending on what needs to be measured.
- Activate the laser – usually by pressing a button on the device.
- Make sure the laser is level – manually adjust the beam if necessary.
- Measure the space – use the level laser to accurately measure the area.
Thanks to its accuracy, convenience, and ease of use, Rotary Laser Levels are a popular choice for engineering and construction projects of all sizes. Used correctly, they can simplify these processes and save time and money.
2. Setting Up Your Rotary Laser Level
A rotary laser level is a great reference tool that allows you to quickly and accurately level, grade, and align almost any surface. To get started using your rotary laser level, you’ll need to set it up properly.
To start, you’ll need sturdy tripod stands to mount the laser onto, as well as a level if it’s not already installed in the unit itself. Here’s a list of things you’ll need before you get started:
- Rotary laser level
- Tripod stands
- Level (if unit does not have one installed)
Once you have the necessary components, you’ll need to set up the tripod stands. To do this, make sure that the legs are spread out wide and evenly, and that they are firmly pressed into the ground. The height of the stand will depend on the height of the surface you’re measuring and the size of your laser, so you may need to adjust. The goal is to make sure the laser is relatively level when you’re ready.
Next, secure the rotary laser onto the tripod stand. This is best done with a clamp so that the laser is in its proper orientation and will remain that way. When it’s in place, tighten the screws on the clamp to make sure everything is held firmly together.
Once the laser is secure, take time to orient the laser level properly using the side knobs. Doing so will ensure that measurements and alignments are properly leveled. Read more: How To Use A Laser Level: A Beginner’s Guide
3. Tips for Your Rotary Laser Level
1. Don’t Over Reach: Make sure you don’t overstep your limits when using your laser level. Respect the laser’s working radius and keep it within the stated specifications. Keep in mind that it cannot reach extremely far distances so be aware of your range.
2. Calibrate: It’s important to check your level and make sure it is calibrated before you start any job. This is done by setting the laser on a tripod and rotating it in 360 degrees and confirming that the beam maintains a flat level line.
3. Check Your Batteries: Make sure you use fresh, fully charged batteries with your laser. If you notice the laser beam is fading during use, change your battery as soon and you can.
4. Mount It Safely: Make sure you securely mount your laser level on a tripod and always use the appropriate safety measures when setting up the unit.
5. Know Your Outdoor Range: Pay attention to the outdoor range your laser is able to reach. Depending on the conditions, your laser can reach varying distances.
6. Read The Manual: Lastly, make sure you read the user’s manual carefully. Even if you consider yourself an experienced user, the manual will provide you with ideas and instructions on how to use your laser level in the most efficient way.

4. Benefits of Using a Rotary Laser Level
If you plan to carry out a construction project or renovate your house, using a rotary laser level is a must. From accurate Leveling to Horizontal and Vertical Alignment, a rotary laser level makes all these tasks simpler by providing Crossing Lines and even Plumbing lines with greater accuracy than ever before.
Here are some of the :
- It allows you to quickly and accurately align walls, fences, and posts with a minimum of effort.
- It is easier and easier to use than a traditional laser beam level.
- It can be used to measure distances on a horizontal plane, as well as on sloped surfaces with great accuracy.
- It is also capable of creating variable center lines and turns to build lay-out tasks easier.
- It is the ideal tool to transfer measurements in both horizontal and vertical plans.
- It can even be used to layout large projects like pond diagrams, curbs, walls, and decks.
Rotary laser levels are the perfect choice for professional surveyors and handymen because they are relatively small and light, so you can carry them around easily. Above all, it is also a cost-effective way to add accuracy and productivity to your construction project.
5. Troubleshooting Common Issues with Rotary Laser Levels
When using a rotary laser level, it’s important to know how to troubleshoot issues – after all, they are sophisticated machines and can stop working for a variety of reasons. To help you fix these problems, here are five of the most common issues with rotary laser levels and how you can troubleshoot them:
- The laser will not rotate: The issue could be caused by a faulty connection or possibly an internal component that is damaged or not working. Double check the power connection and replace it with a new one if necessary, then try powering the laser again. If the issue still persists, it’s a good idea to take the laser to an experienced technician for repair.
- Laser indicator is dim: This is usually caused by the laser needing new batteries. Make sure to always use the type of battery recommended for your laser level and replace them if needed.
- Laser is out of level or inaccurate: This likely means that there is an imbalance in the internal components which must be adjusted. Make sure the switch is turned on and the rotating motor is running smoothly, then adjust the adjustment screws accordingly.
- Receiver is not picking up the laser beam: This could be due to the receiver being too far away from the laser source. You should also make sure the laser is mounted properly and the beam is centered, as well as check that the receiver’s bracket is securely attached to the wall.
- The laser is giving off a faint beam: This usually means that dirt or debris has gathered in the lens of the laser, which can obscure the beam. Clean the lens with an appropriate cloth and check to make sure the beam is clear and accurate.
Also read: How to Utilize a Laser Level Effectively in Daylight
Conclusion
Overall, investing in a rotary laser level can be a great move for weekend warriors and contractors alike. Using this tool takes guesswork out of your DIY activities and ensures accuracy in your projects. With a few pointers in mind, you’ll be good to go. From the basics of setup and powering up to understanding the different features, it’s easier than ever to get the most out of your rotary laser level.